
The best way to fix a messy garage is by using smart storage hacks that maximize every inch of your floor. I know how it feels to trip over a rusty shovel while just trying to park my car.
You probably just want a space where you can actually find your screwdriver without a search party. These affordable methods help you reclaim your workspace while keeping your sanity intact throughout the process.
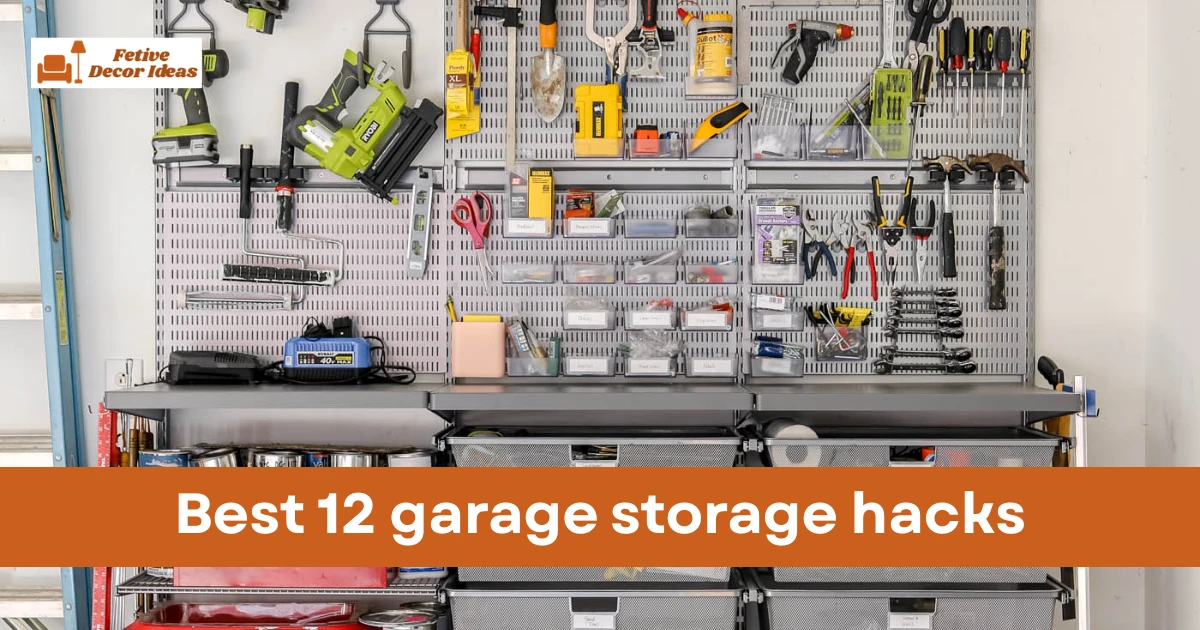
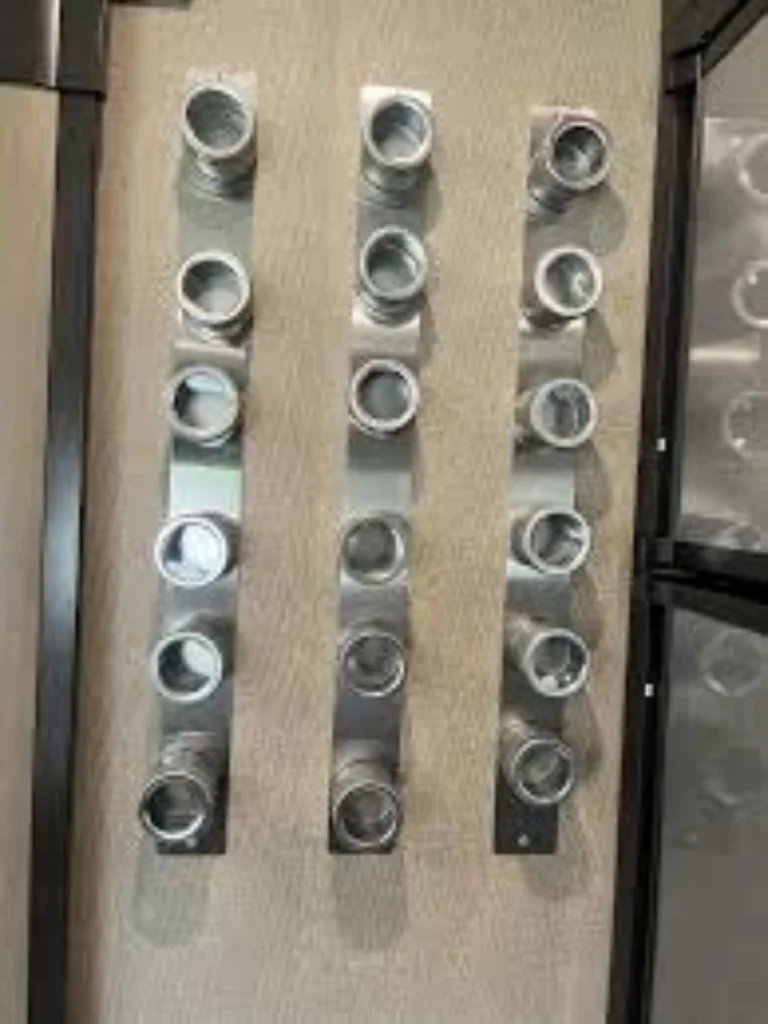
Use Magnetic Strips for Metal Hand Tools
I started using magnetic strips because I got tired of digging through a heavy toolbox for one small wrench. These powerful strips hold your pliers and screwdrivers right on the wall where you can see them.
You just screw the metal bar onto a stud or a flat board above your workbench area. It keeps your most used items at eye level so you never have to stop working to find tools.
This hack is great because it uses wall space that usually stays empty and boring in most homes. I found that even heavy hammers stay put if you buy the high strength magnetic bars from the store.
Your workbench stays clear of clutter which makes every DIY project feel much less stressful than before. It also looks pretty professional when all your shiny metal tools are lined up in a perfect row.
1. Install Overhead Racks for Seasonal Plastic Bins
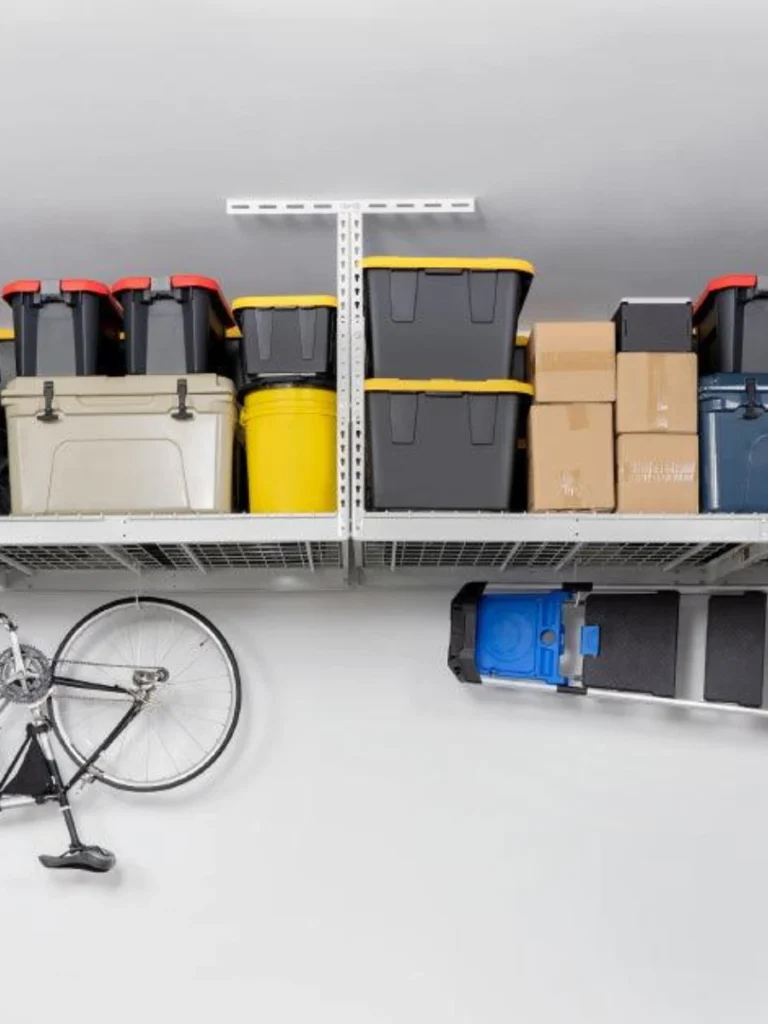
My garage floor used to be a graveyard for holiday decorations and old camping gear that I rarely use. I realized that the ceiling is basically a giant empty shelf just waiting for some heavy duty racks.
These overhead systems let you slide large plastic bins up and out of your direct line of sight. You can store your winter coats or summer pool toys up there until you actually need them next year.
I suggest using clear bins so you can see what is inside without having to climb a ladder. It makes life easier when you are looking for that one specific box of lights in December.
Building these racks with wooden cleats is a cheap way to get those bulky items off the concrete floor. You will finally have enough room to park your car without hitting a stack of dusty containers.
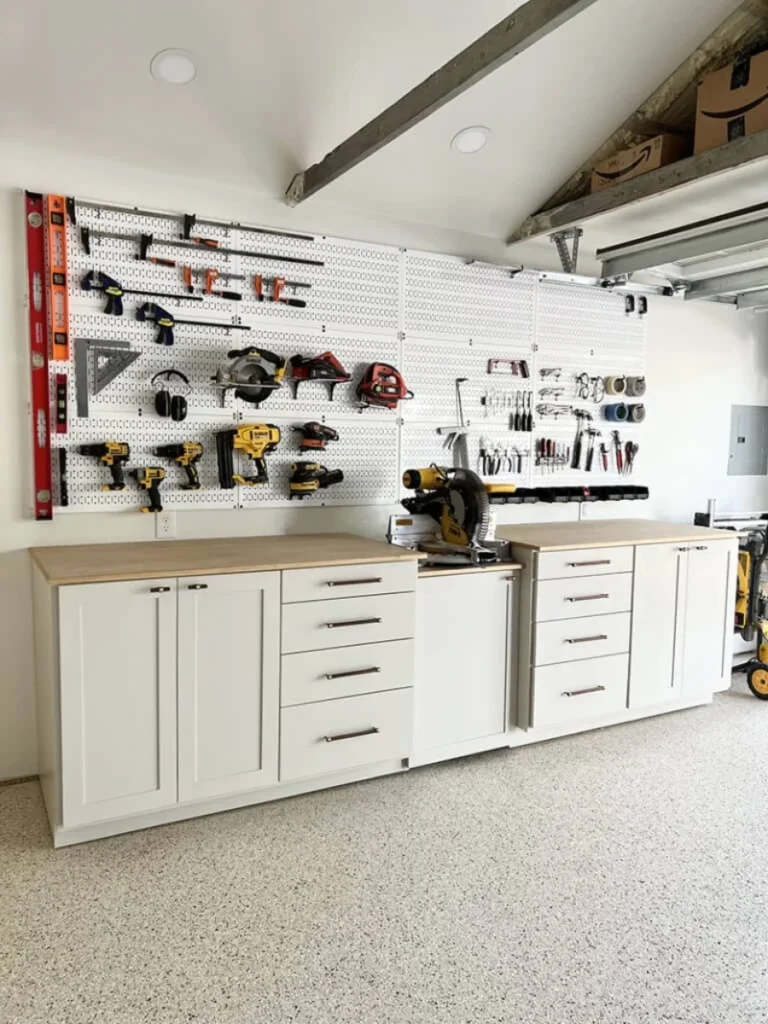
2. Create a Pegboard Wall for Custom Organization
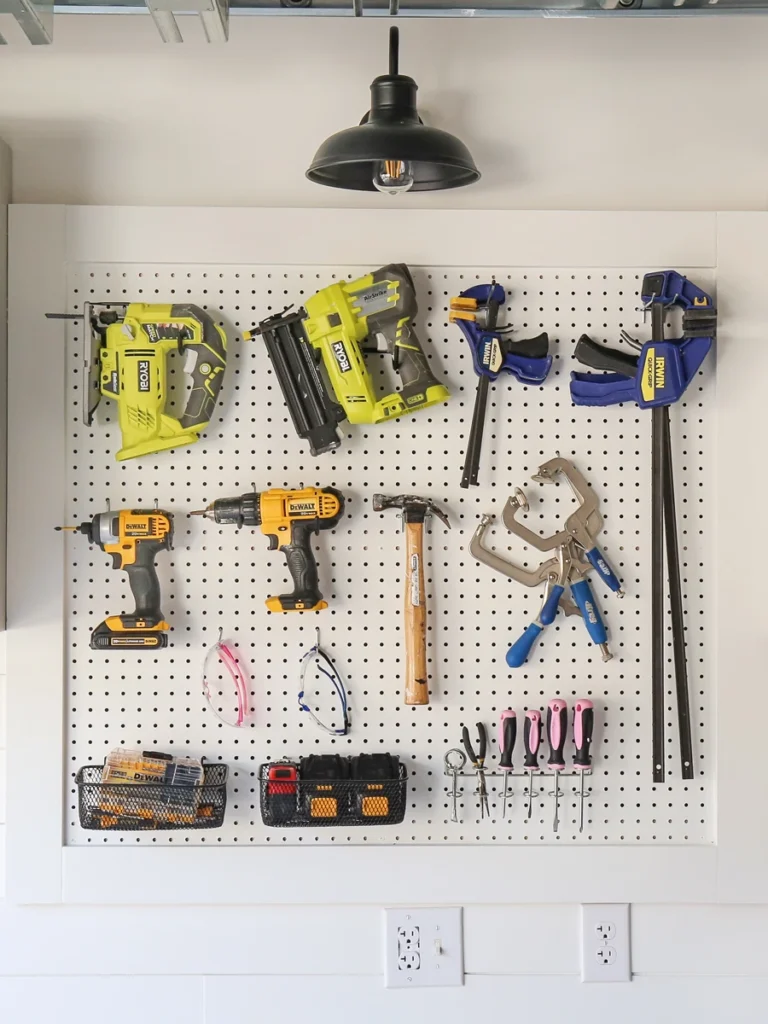
I think a pegboard is the most flexible tool you can add to a garage for instant organization. You can move the hooks around whenever you buy a new tool or change your favorite hobby.
It turns a messy pile of gear into a visual map of everything you own in your workshop. I like to outline my tools with a marker so I know exactly where each item belongs.
This system works for everything from rolls of tape to heavy power drills if you use the right hooks. You can find kits at any hardware store that include various clips and small hanging plastic baskets.
Painting the board a bright color makes the whole garage feel more like a room and less like a cave. It is a simple weekend project that provides a massive payoff for your daily productivity and mood.
3. Build a Vertical Shovel and Rake Rack
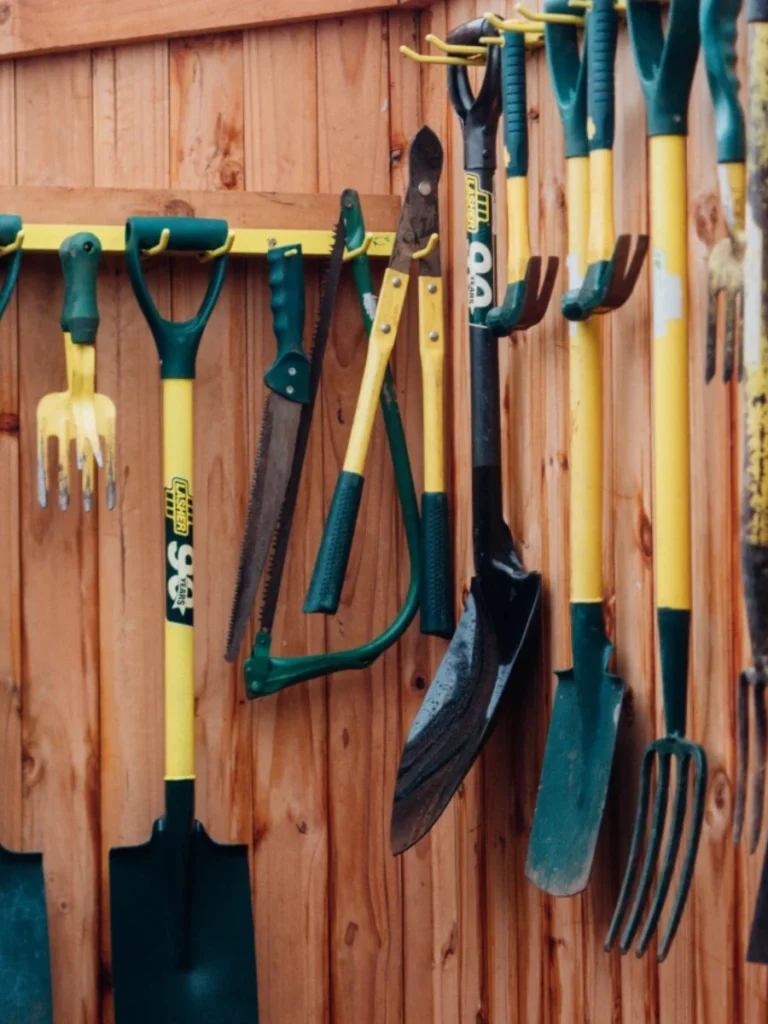
Leaning your yard tools against the wall is a recipe for a domino effect that hits your car door. I built a simple vertical rack using scraps of wood to keep my shovels and rakes upright.
You just need to cut some slots into a sturdy board and mount it at chest height on the wall. This keeps the long handles from falling over and creates a much safer environment for everyone walking by.
I noticed that storing them this way also prevents the metal heads from getting rusty on the damp floor. It saves a lot of horizontal space which is a huge win for smaller one car garages.
You can even use PVC pipe scraps to create individual holsters for each specific garden tool you own. It looks clean and keeps your rake from attacking you like a cartoon character when you step on it.
4. Mount Foldable Workbenches to Save Floor Area
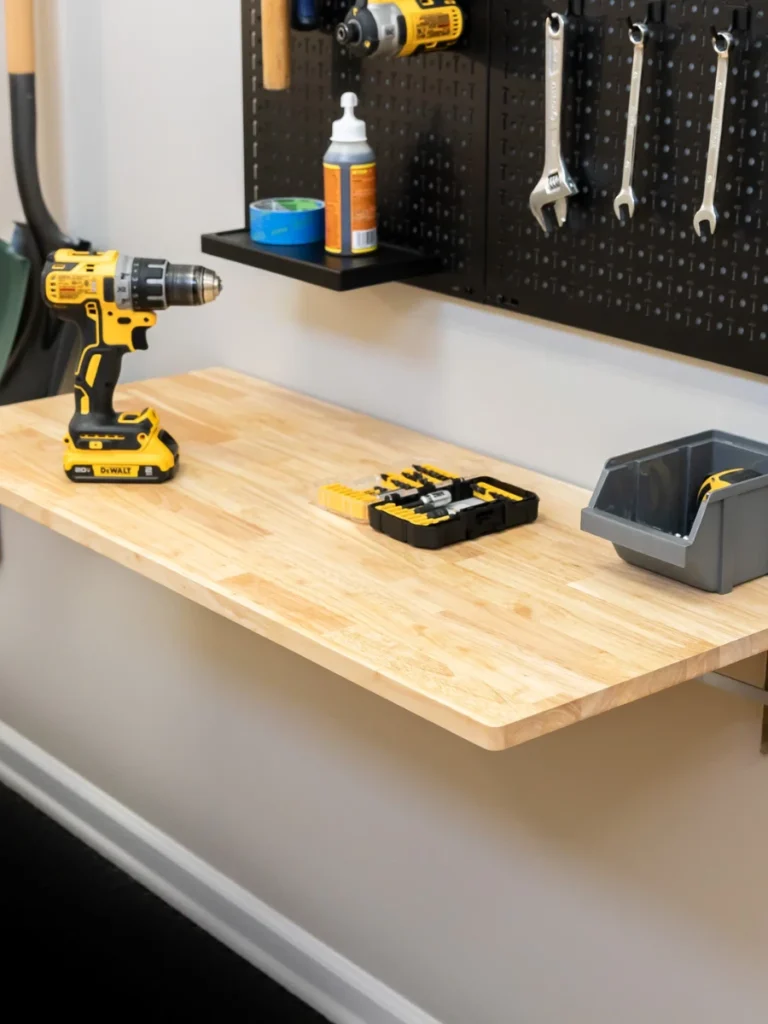
I used to struggle with a giant stationary table that took up way too much room in my workspace. A foldable workbench is a top choice because it stays flat against the wall when you finish your project.
You can build this using a heavy piece of plywood and some sturdy hinges from the hardware store. It gives you a professional surface for repairs without permanently sacrificing your precious floor space every single day.
I love how I can park my car exactly where the table usually sits once the work is done. It makes the garage feel much larger and allows for better movement when I am cleaning the floors.
This setup is perfect for anyone who only does DIY projects on the weekends but needs a clear garage. You get the best of both worlds with a solid work area that vanishes whenever you want it to.
5. Use PVC Pipe Offcuts for Power Tool Holsters
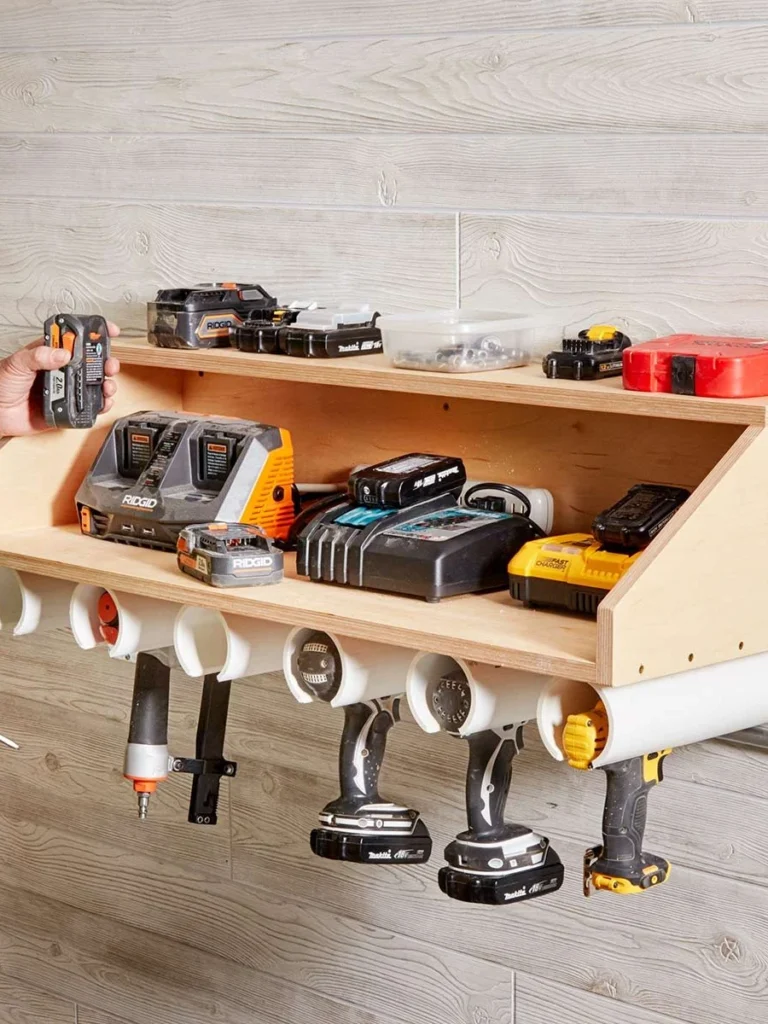
I found a clever way to store my cordless drills by using leftover pieces of large diameter PVC pipe. You just cut a small notch in the pipe so the handle of the tool slides right inside.
These holsters keep your expensive power tools safe and away from the dust on your main work table. I screwed mine to the underside of a shelf to keep the battery chargers within reach at all times.
It looks incredibly organized and prevents your drills from getting knocked over or scratched while you are busy. I even labeled each pipe so I know which tool goes where after a long day of building things.
This is a very affordable hack that uses scraps you might already have lying around in your scrap pile. It is a smart way to protect your gear while keeping your most used tools ready for action.
6. Hang Bikes from the Ceiling with Heavy Hooks
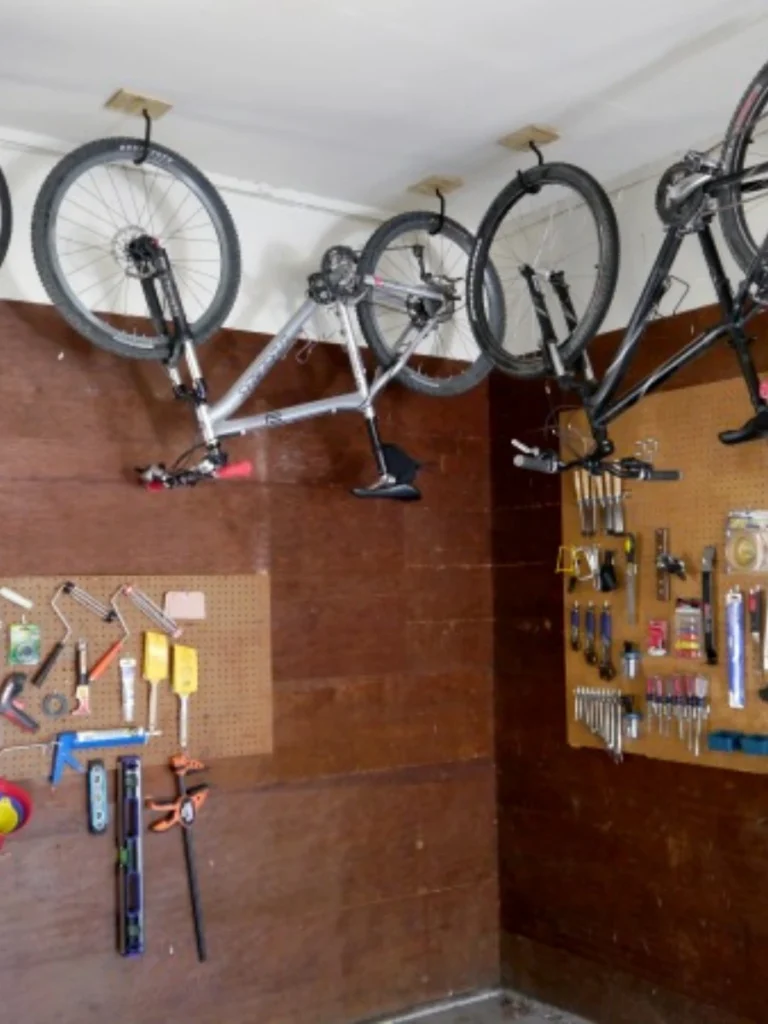
Bikes are usually the biggest space hogs in any garage because they are so awkward and bulky to store. I started using heavy duty ceiling hooks to lift them up and out of the walking path.
You simply screw the hooks into the ceiling joists to ensure they can hold the weight of the frames. Hanging them by the front wheel is a professional trick that saves a massive amount of wall area.
I noticed that getting the bikes off the ground also protects the tires from getting flat spots over winter. It makes the garage look much cleaner and prevents people from tripping over pedals in the dark.
If you have kids, you can install a pulley system that makes it easier to lower the bikes down. This keeps the floor clear for your car while keeping the family gear safe and organized up high.
7. Add a Sliding Storage System Between Joists
The space between your ceiling joists is a hidden gold mine for storing long items like scrap wood. I realized I could screw small wooden strips to the joists to create a sliding track system.
This allows you to slide thin bins or loose pieces of lumber into the gaps above your head. It is a brilliant way to use every cubic inch of your garage without adding any bulky furniture.
I use this area for things I only need once or twice a year like long pieces of trim. It keeps the messy items out of sight and prevents them from cluttered up your main storage shelves.
You can even use this for storing fishing rods or lightweight ladders that usually lean against the corners. It is a simple weekend project that turns empty air into a functional and hidden storage cabinet.
8. Use Magnetic Spice Tins for Small Hardware
I used to spend hours looking for a single washer or a specific size of wood screw in a junk drawer. I started using small magnetic tins to hold all my bits and pieces on the side of a metal cabinet.
These clear lids let you see exactly what is inside without having to open every single container first. It turns a messy pile of hardware into a neat grid that looks great and saves a lot of time.
I find that keeping these at eye level makes my repair jobs move much faster than they used to. You can even stick them to the underside of a metal shelf to use every bit of available surface.
This is a top way to organize those tiny items that usually get lost in the bottom of a toolbox. It keeps your workbench clear and ensures you never have to buy the same box of nails twice.
9. Create a Tape Dispenser from Scrap Wood
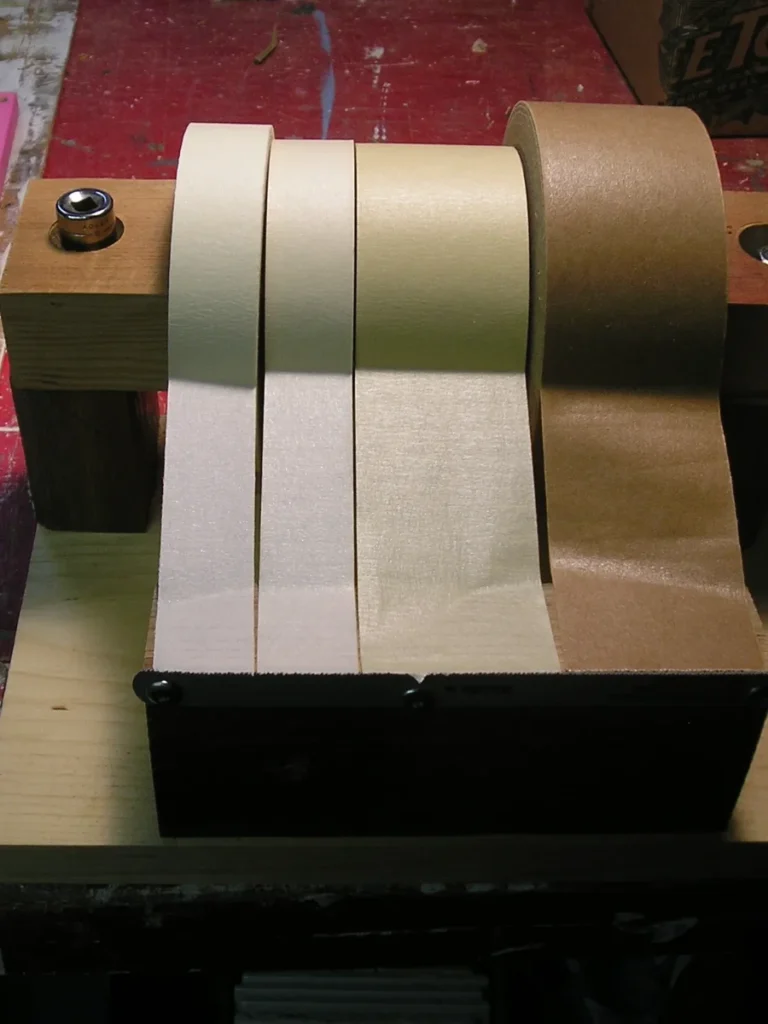
My rolls of duct tape and masking tape used to roll around on my shelves like they were trying to escape. I built a simple wooden box with a dowel running through the middle to keep them all in one place.
Adding a small hacksaw blade to the edge of the box creates a perfect cutting surface for the tape. It allows me to grab a piece of tape with one hand while holding my project with the other.
I mounted mine right next to my workbench so it is always within reach when I need a quick fix. This hack keeps the sticky edges of the tape clean from the sawdust that usually covers my garage floor.
You can make this as long or as short as you need depending on how many different tapes you own. It is a simple build that adds a lot of professional utility to a basic home workshop setup.
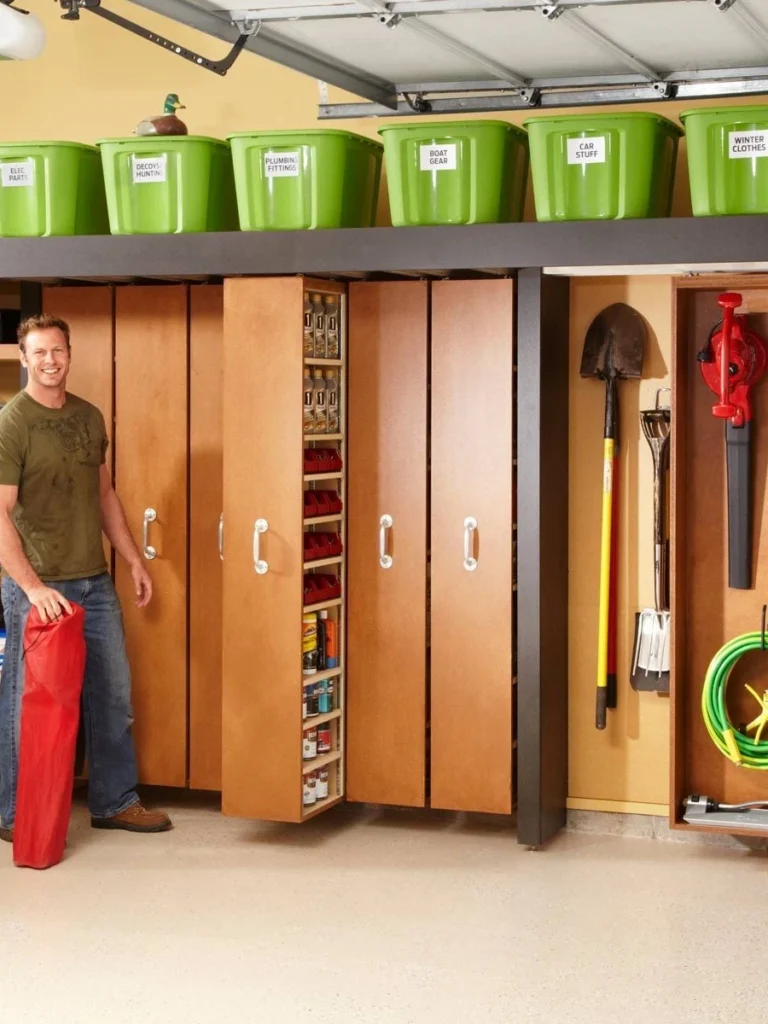
10. Repurpose Old Kitchen Cabinets for Storage
I am a big fan of checking local listings for people giving away their old kitchen cabinets for free. These sturdy boxes are much better for a garage than the cheap plastic shelving units you find at the store.
You can mount them high on the wall to keep chemicals and paints out of the reach of small children. They provide a clean look that hides all the visual clutter behind solid doors for a tidy appearance.
I painted mine a dark gray to hide the grease and dirt that naturally builds up in a working garage. It makes the space feel more like a finished room and less like a dusty storage locker for old junk.
Using vertical cabinets also gives you a nice countertop area for sorting through your tools or mail. It is a low cost way to get professional grade storage without spending thousands on a custom system.
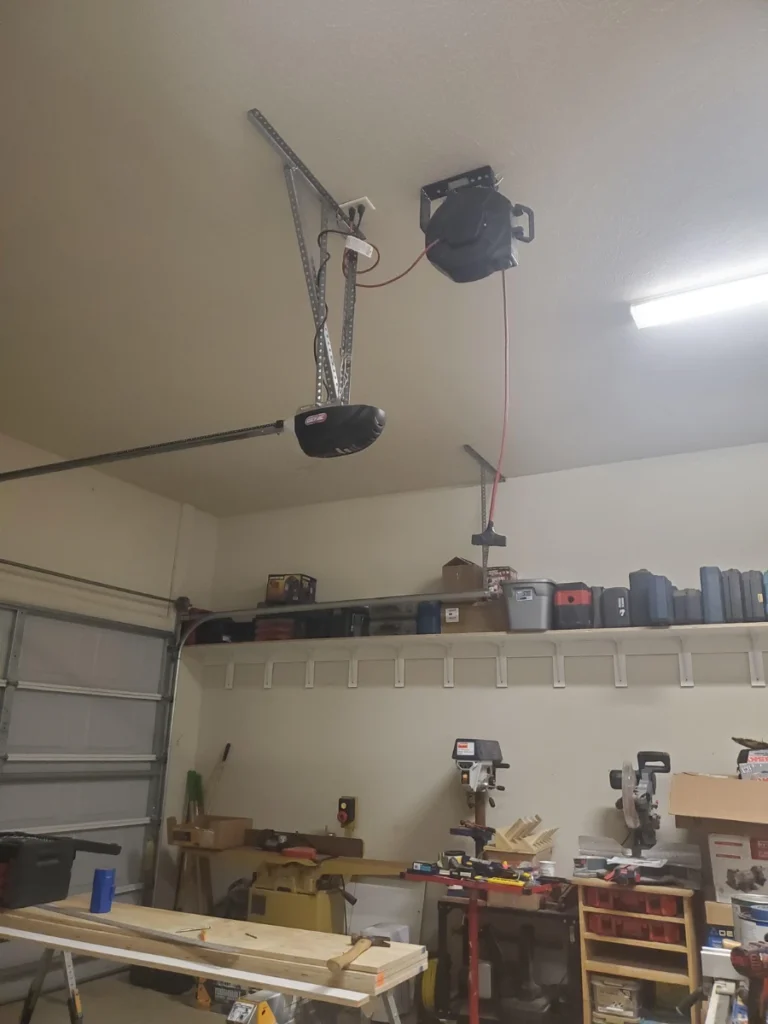
11. Install a Cord Reel to Manage Long Extensions
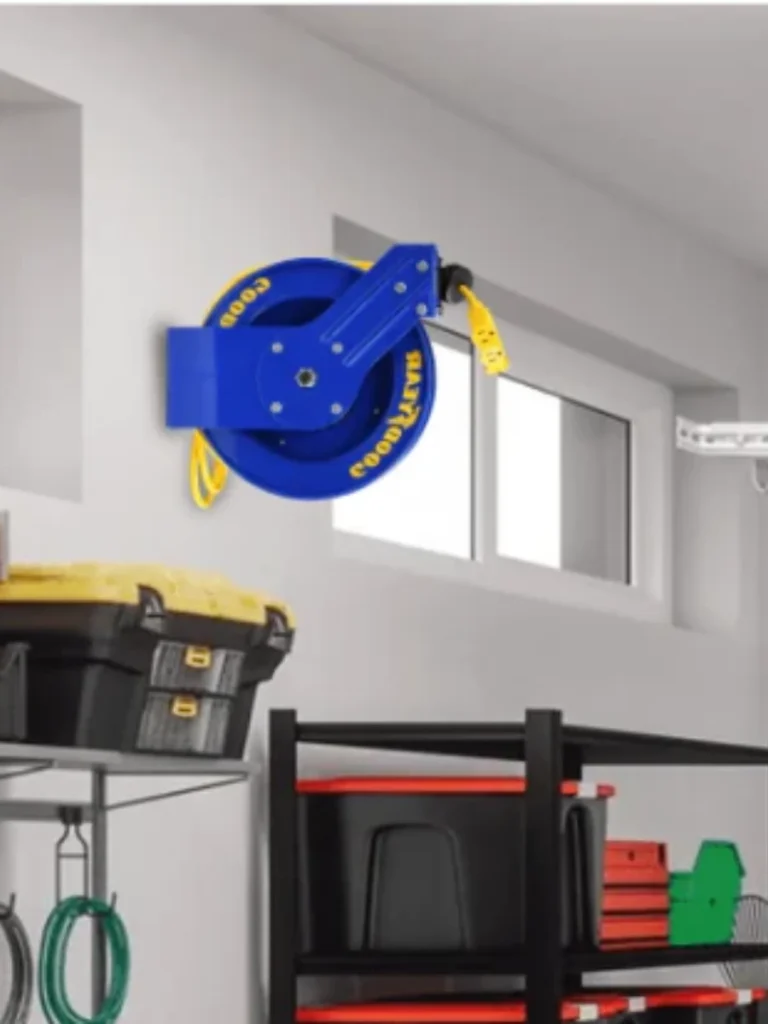
Extension cords are the most annoying thing to untangle when you just want to get a quick job done. I installed a retractable cord reel on the ceiling in the center of my garage to solve this.
It allows me to pull power to any corner of the room or even out into the driveway for car cleaning. When I am finished the cord zips back up and out of the way so nobody trips on it.
I love that this keeps my floors totally clear of those orange tripping hazards that always seem to be in the way. It is a smart investment for anyone who uses power tools or works on their vehicle often.
This setup protects the cords from getting pinched under heavy tires or caught in the garage door tracks. It is a simple fix that makes your workspace safer and much more efficient for daily use.
12. Install a Ceiling Cord Reel for Better Power Reach
I think a retractable cord reel is the best investment for anyone who actually uses power tools in their garage. It solves the annoying problem of tripping over orange extension cords that always seem to be in the wrong place.
You should mount the reel directly to a ceiling joist in the center of your workspace for the best coverage. This position allows the cord to reach every corner of the room or even extend out into your driveway easily.
I suggest looking for a model with a built in circuit breaker to protect your expensive tools from power surges. It is much safer than running multiple long cords across a damp concrete floor during a rainy weekend project.
The best part is how it zips back into the housing with a simple tug when you finish your work. Your floor stays completely clear of tangles which makes the whole garage feel much more professional and safe.
Use a Cord Reel to Improve Safety and Workflow
I noticed that keeping power cords off the ground keeps them much cleaner and prevents the outer casing from cracking. A ceiling reel keeps the wire away from sharp metal scraps and heavy tires that can cause damage.
It also keeps your children and pets safe from accidentally tripping or chewing on a live wire on the floor. I find that I am much more likely to start a project when I can get power instantly.
You can even find reels that have multiple outlets on the end so you can plug in several items. This is great for keeping a work light and a drill plugged in at the same time without swapping.
This hack turns a basic storage area into a high functioning workshop that is ready for any DIY task. It is a smart way to upgrade your garage while keeping the overall look neat and very organized.
Comparison of Popular Storage Methods
| Method | Best For | Cost Level | Difficulty |
| Magnetic Strips | Hand Tools | Low | Very Easy |
| Overhead Racks | Seasonal Bins | Medium | Moderate |
| Pegboards | Frequent Use | Low | Easy |
Tips for Maintaining Your Garage Organization
- Annual Purge: Go through your bins every spring to get rid of things you did not use all year.
- Label Everything: Use a large marker or a label maker so your family knows where to put things back.
- Floor Coatings: Consider a simple epoxy floor to make cleaning spills much easier and faster than bare concrete.
- Lighting Upgrade: Install bright LED shop lights so you can actually see the organized space you created.
Conclusion
I hope these garage storage hacks help you turn your cluttered space into a functional and clean workshop. Keeping your tools and gear organized is not just about looks.
Your garage should be a place where you can actually get work done or park your car without stress. By using vertical space and simple DIY solutions, you can maximize your home’s footprint without spending a fortune.
The best part about a clean garage is the sense of accomplishment you feel every time you open the big door. I truly believe that an organized home leads to a more relaxed life for everyone living in it.
FAQs
I suggest starting with a pegboard or DIY wooden racks made from scrap lumber. These methods use vertical space and cost very little while providing a huge improvement in how you store your tools.
The secret is to have a specific home for every single item you own in the space. If every screwdriver has a designated spot, it is much easier to put it back after you finish using it.
Yes, as long as you secure them directly into the ceiling joists with the proper heavy duty hardware. I always check the weight rating on the box to make sure I am not overloading the system.
Absolutely, because most of these ideas focus on using the walls and the ceiling instead of the floor. This leaves the ground clear for your car which is the main goal for most small spaces.
Most of these projects only require a basic drill, a level, and a screwdriver to complete successfully. I designed these tips so that any homeowner can do them over a normal weekend with basic skills